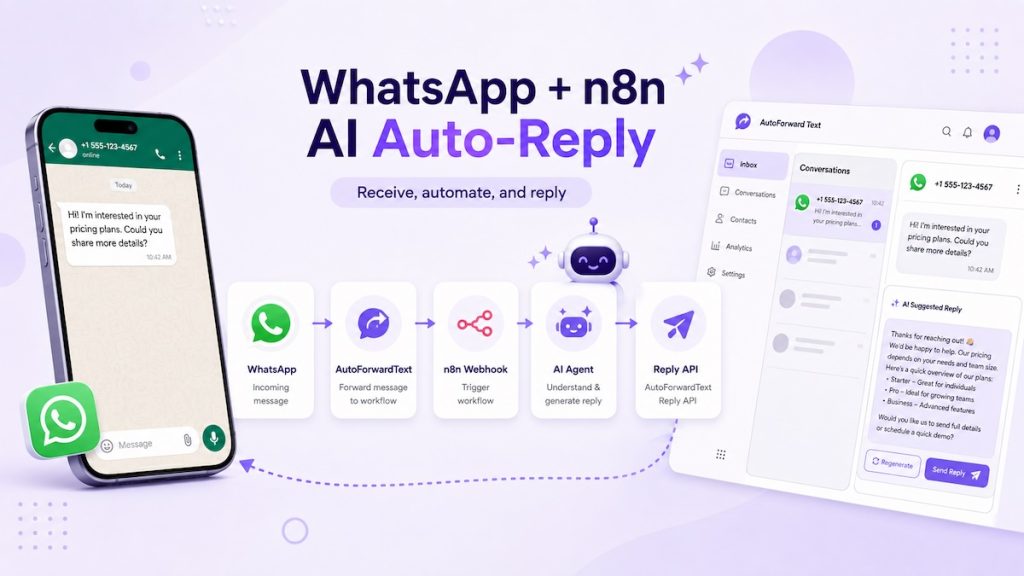
You can use n8n to receive an incoming WhatsApp message, send it to an AI Agent, and automatically return the generated answer to the original WhatsApp conversation.
The useful part is that n8n does not need to manage the WhatsApp connection itself. AutoForward Text handles the messaging connection and forwards each incoming message to an n8n webhook together with a message-specific reply endpoint.
What we’re building:
↓
AutoForward Text
↓
n8n Webhook
↓
AI Agent
↓
AutoForward Text Reply API
↓
The core n8n workflow is simple: a Webhook node receives the message, an AI Agent generates the answer, and an HTTP Request node posts that answer to the reply.endpoint supplied with the incoming message.
Before You Start
You will need:
- An AutoForward Text account
- A WhatsApp account connected to AutoForward Text
- An n8n account or self-hosted n8n instance that can receive public webhooks
- An AI model credential supported by your n8n AI Agent setup
- An AutoForward Text API key with reply permission
Build this in stages. First confirm WhatsApp is receiving messages. Then confirm the n8n webhook receives the payload. Add the AI Agent after that, and add the outgoing Reply API request last.
Step 1: Connect WhatsApp
If you do not already have an account, sign up at AutoForwardText.com and log in to your dashboard.
Next, open WhatsApp Accounts.
AutoForward Text provides two ways to connect WhatsApp. You can connect an existing WhatsApp account using a QR code, or connect an official WhatsApp Cloud API account.
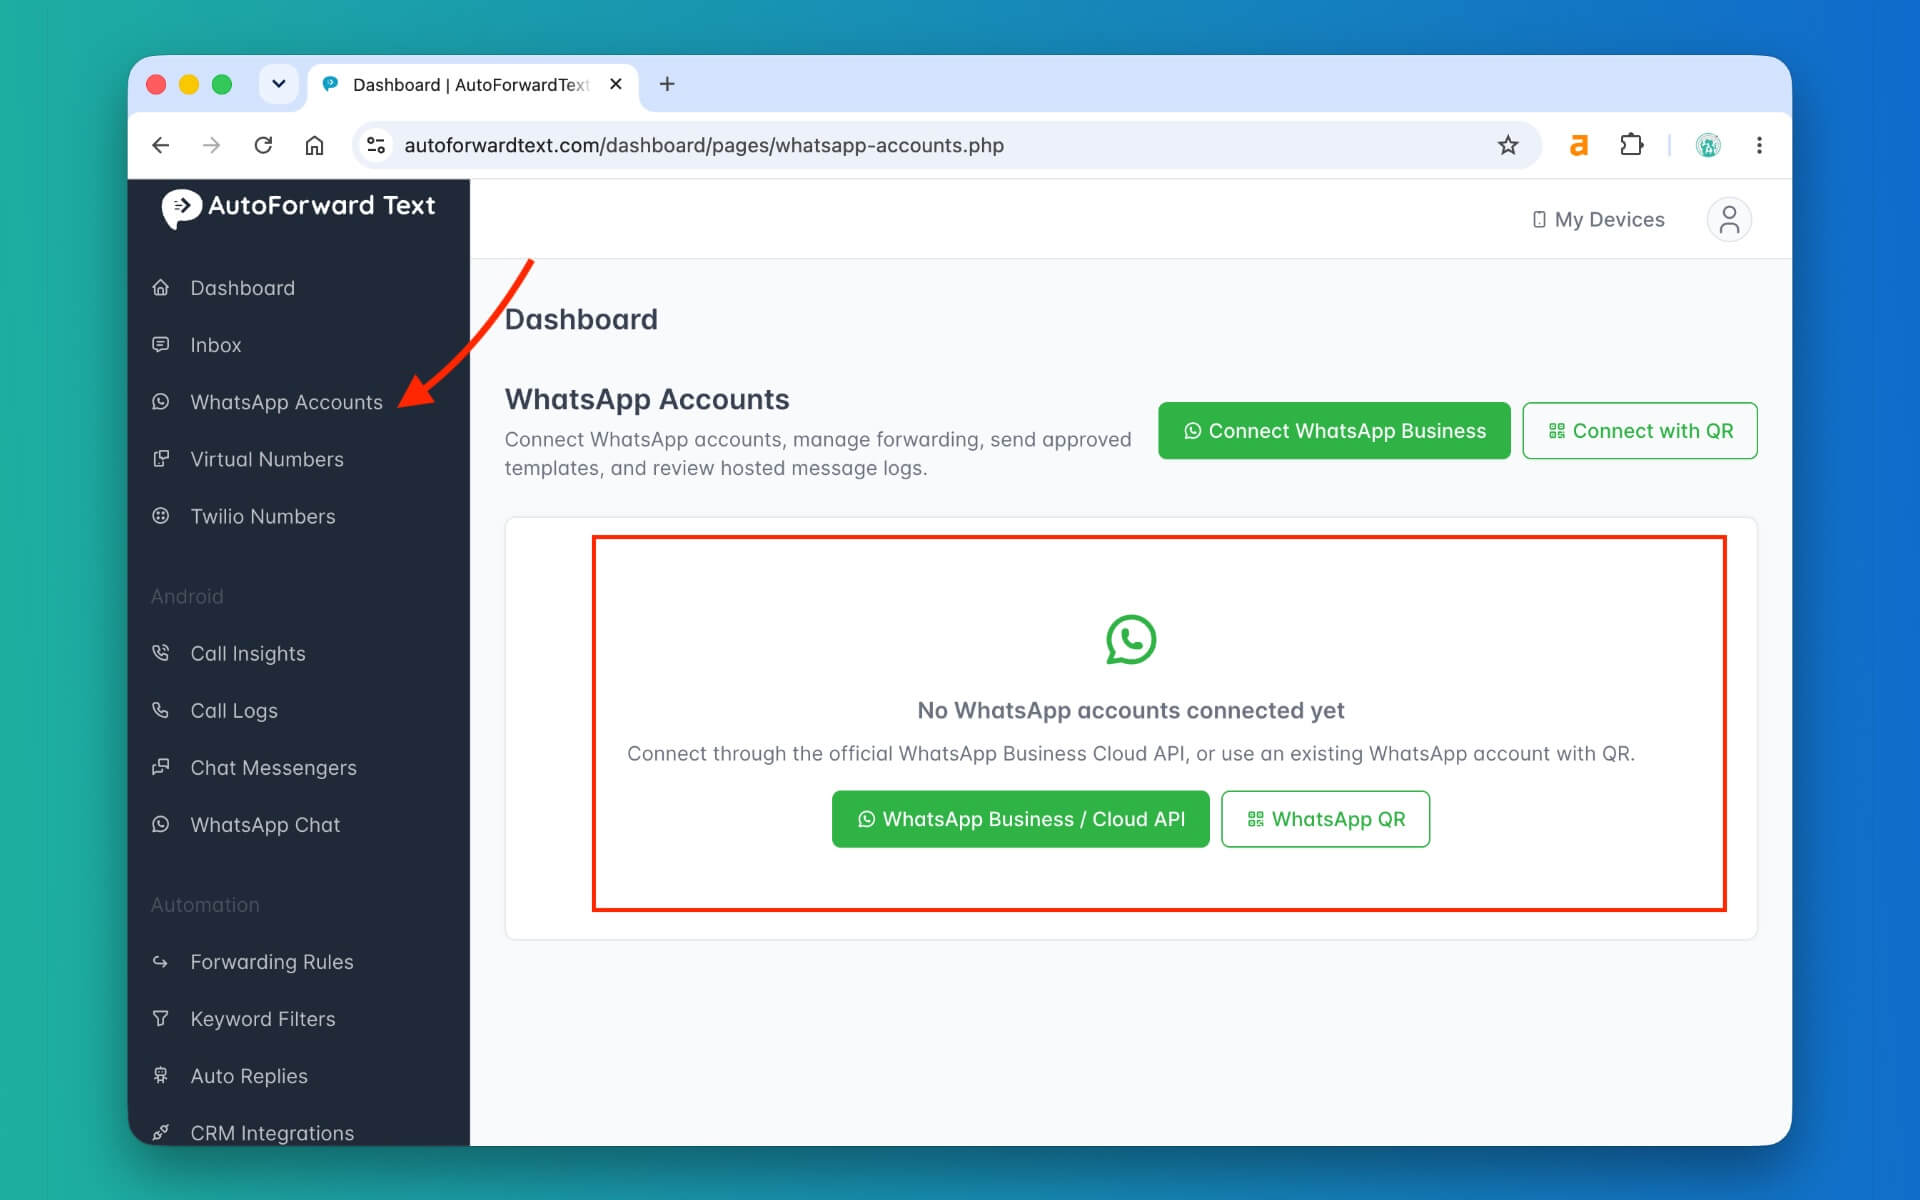
For this tutorial, we will use an already connected WhatsApp Cloud API account.
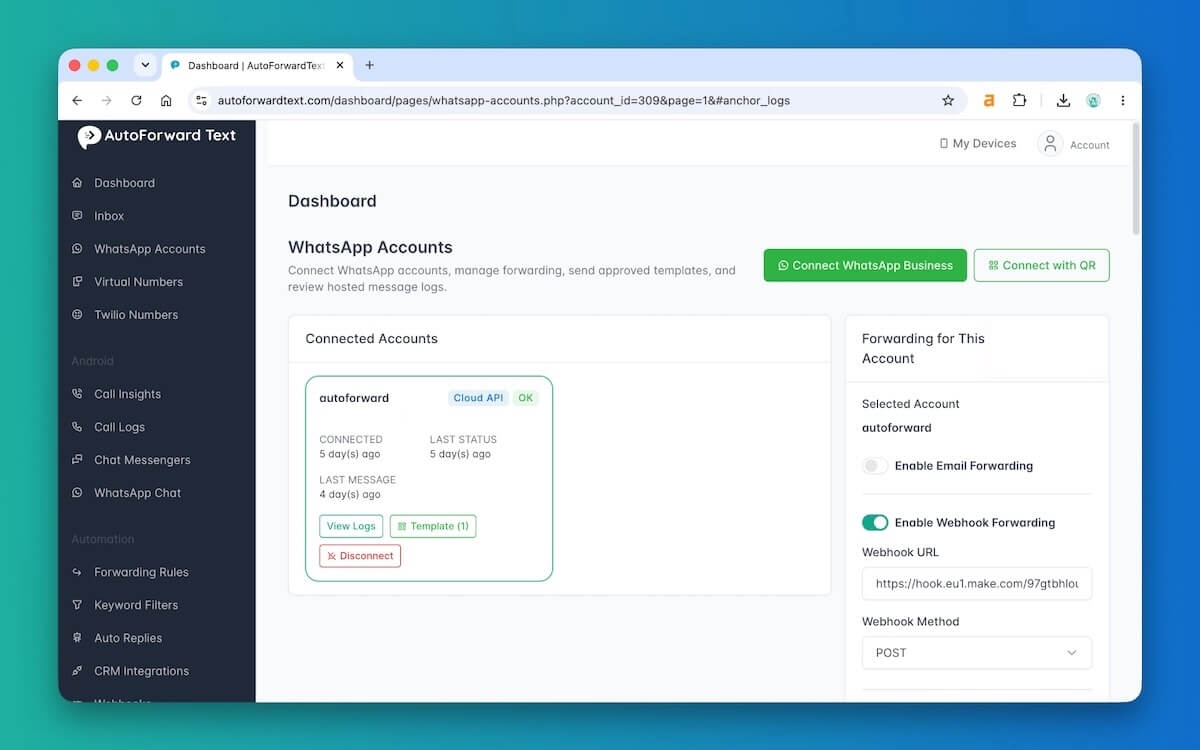
Before configuring n8n, send a normal WhatsApp message from another number and confirm that it appears in the AutoForward Text message log.
If the message reaches AutoForward Text, the WhatsApp side is working and you can move on to n8n.
Step 2: Create an n8n Webhook
Create a new workflow in n8n.
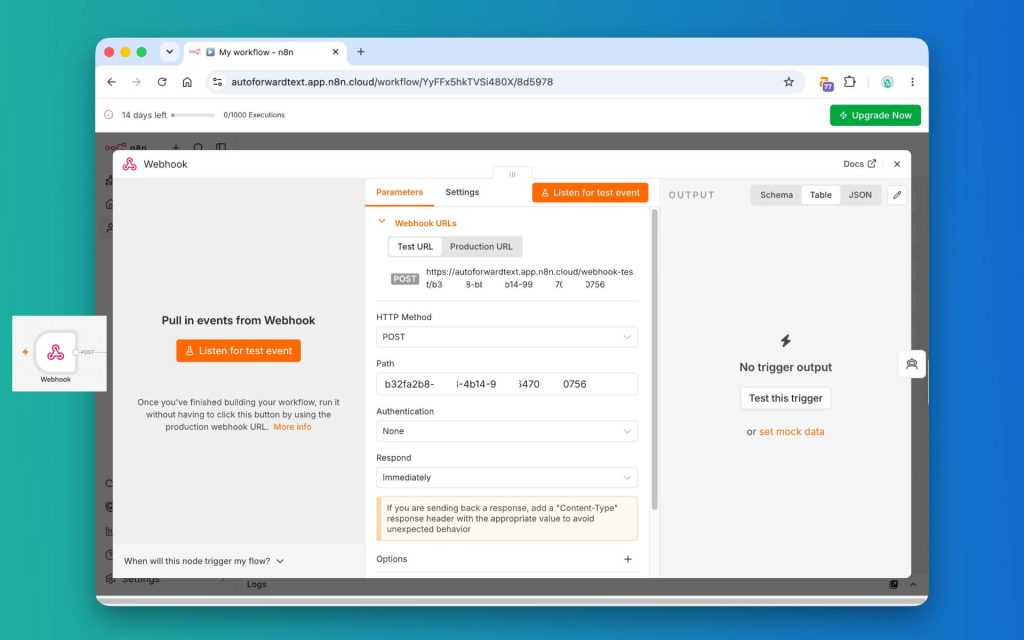
Add a Webhook node as the workflow trigger.
Set the HTTP method to:
POST
You can use a path such as:
whatsapp-ai-agent
n8n provides both a test webhook URL and a production webhook URL.
Use the test URL while building the workflow and waiting for a sample payload. Once the workflow is ready and active, use the production URL in AutoForward Text.
Do not leave the test webhook URL configured for a production workflow. The test URL is intended for workflow development while n8n is listening for a test event.
Step 3: Forward WhatsApp Messages to n8n
Copy the n8n webhook URL and return to AutoForward Text.
Open the forwarding settings for the connected WhatsApp account, enable Webhook Forwarding, paste the n8n webhook URL, and save it.
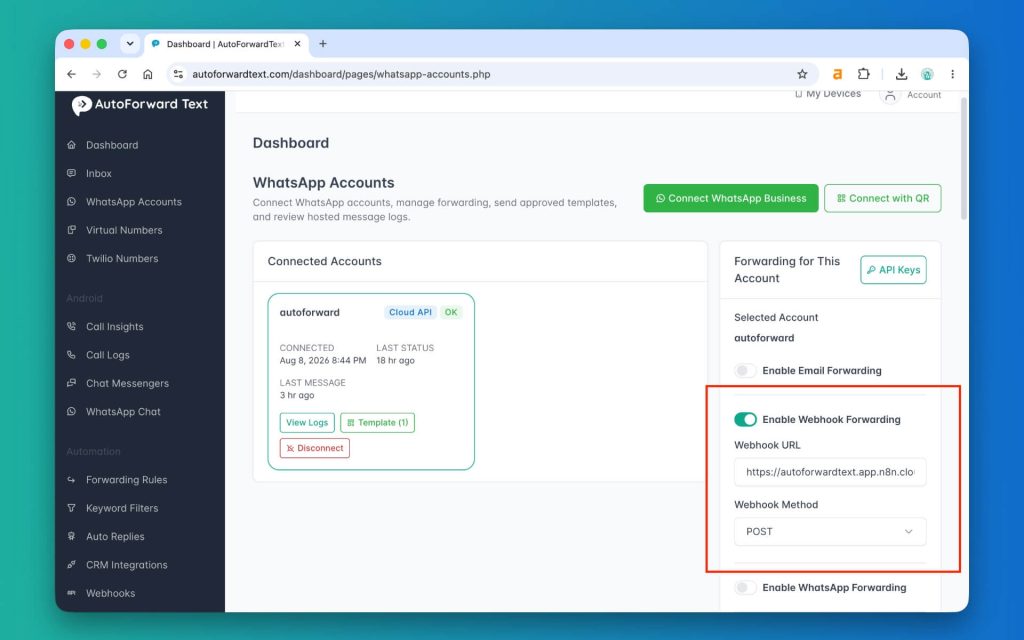
While testing, click Listen for test event or execute the Webhook node so n8n is waiting for the request.
Now send a new WhatsApp message to the connected account.
AutoForward Text will POST the incoming message to n8n.
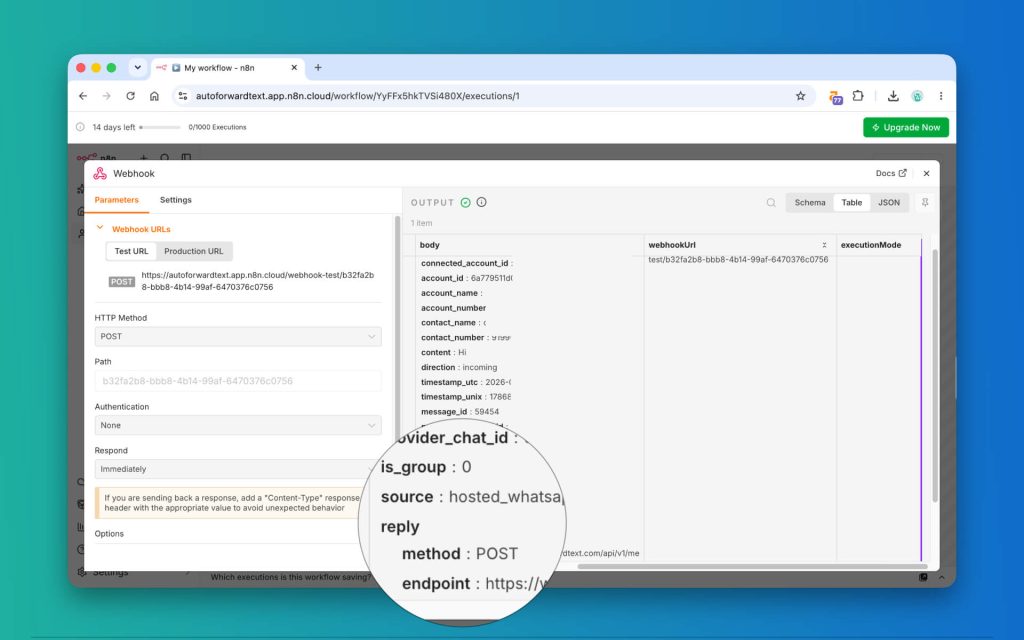
A simplified payload looks like this:
{
  "event": "whatsapp.received",
  "message_id": 9274,
  "contact_name": "Customer",
  "contact_number": "+14155550123",
  "content": "Do you have availability tomorrow?",
  "reply": {
    "method": "POST",
    "endpoint": "https://autoforwardtext.com/api/v1/messages/9274/reply",
    "message_id": 9274
  }
}
In a standard n8n Webhook execution, the posted JSON is available inside the webhook body’s data. The fields we care about are:
content— the incoming WhatsApp messagecontact_number— useful as a stable customer/session identifiermessage_id— identifies the incoming messagereply.endpoint— tells the workflow exactly where to send the response
The reply endpoint is what keeps this workflow simple. n8n does not need to reconstruct the WhatsApp account, conversation ID, provider, or routing information. It posts the generated answer back to the endpoint provided with the original message.
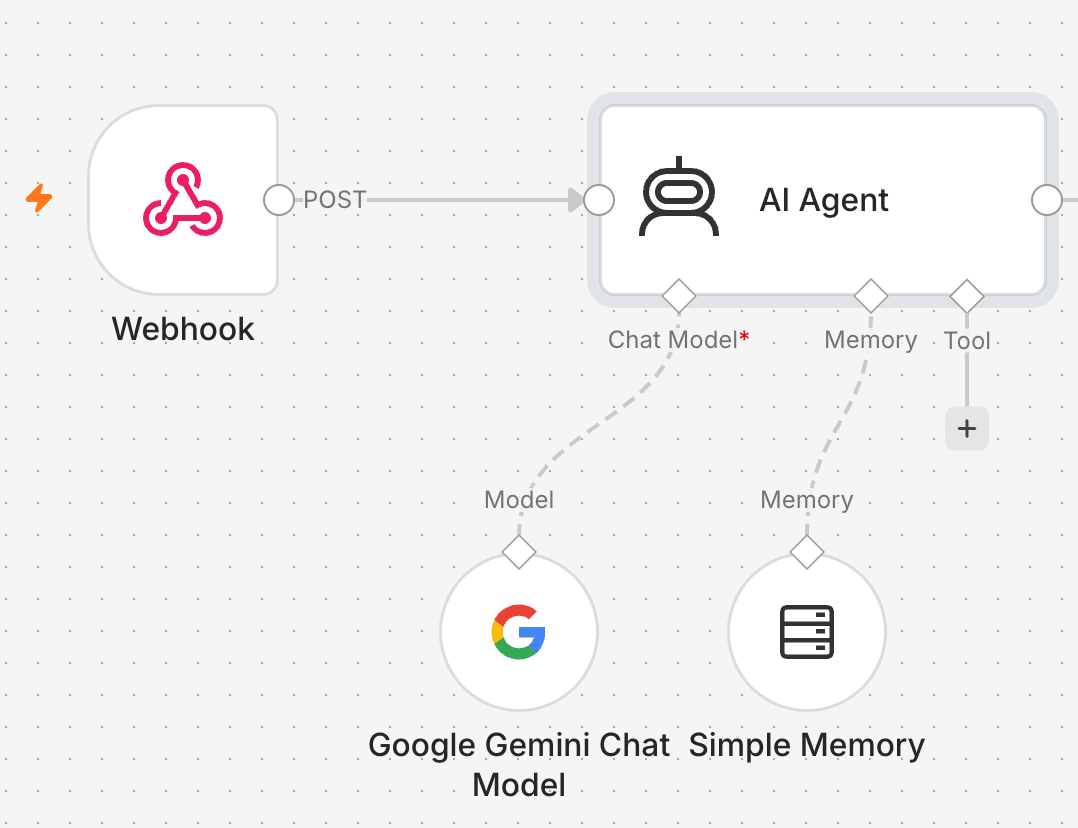
Step 4: Add an n8n AI Agent
Add an AI Agent node after the Webhook node.
The AI Agent needs a connected chat model. Add the model you want to use, such as an OpenAI Chat Model or another supported n8n chat model, and configure its credentials.
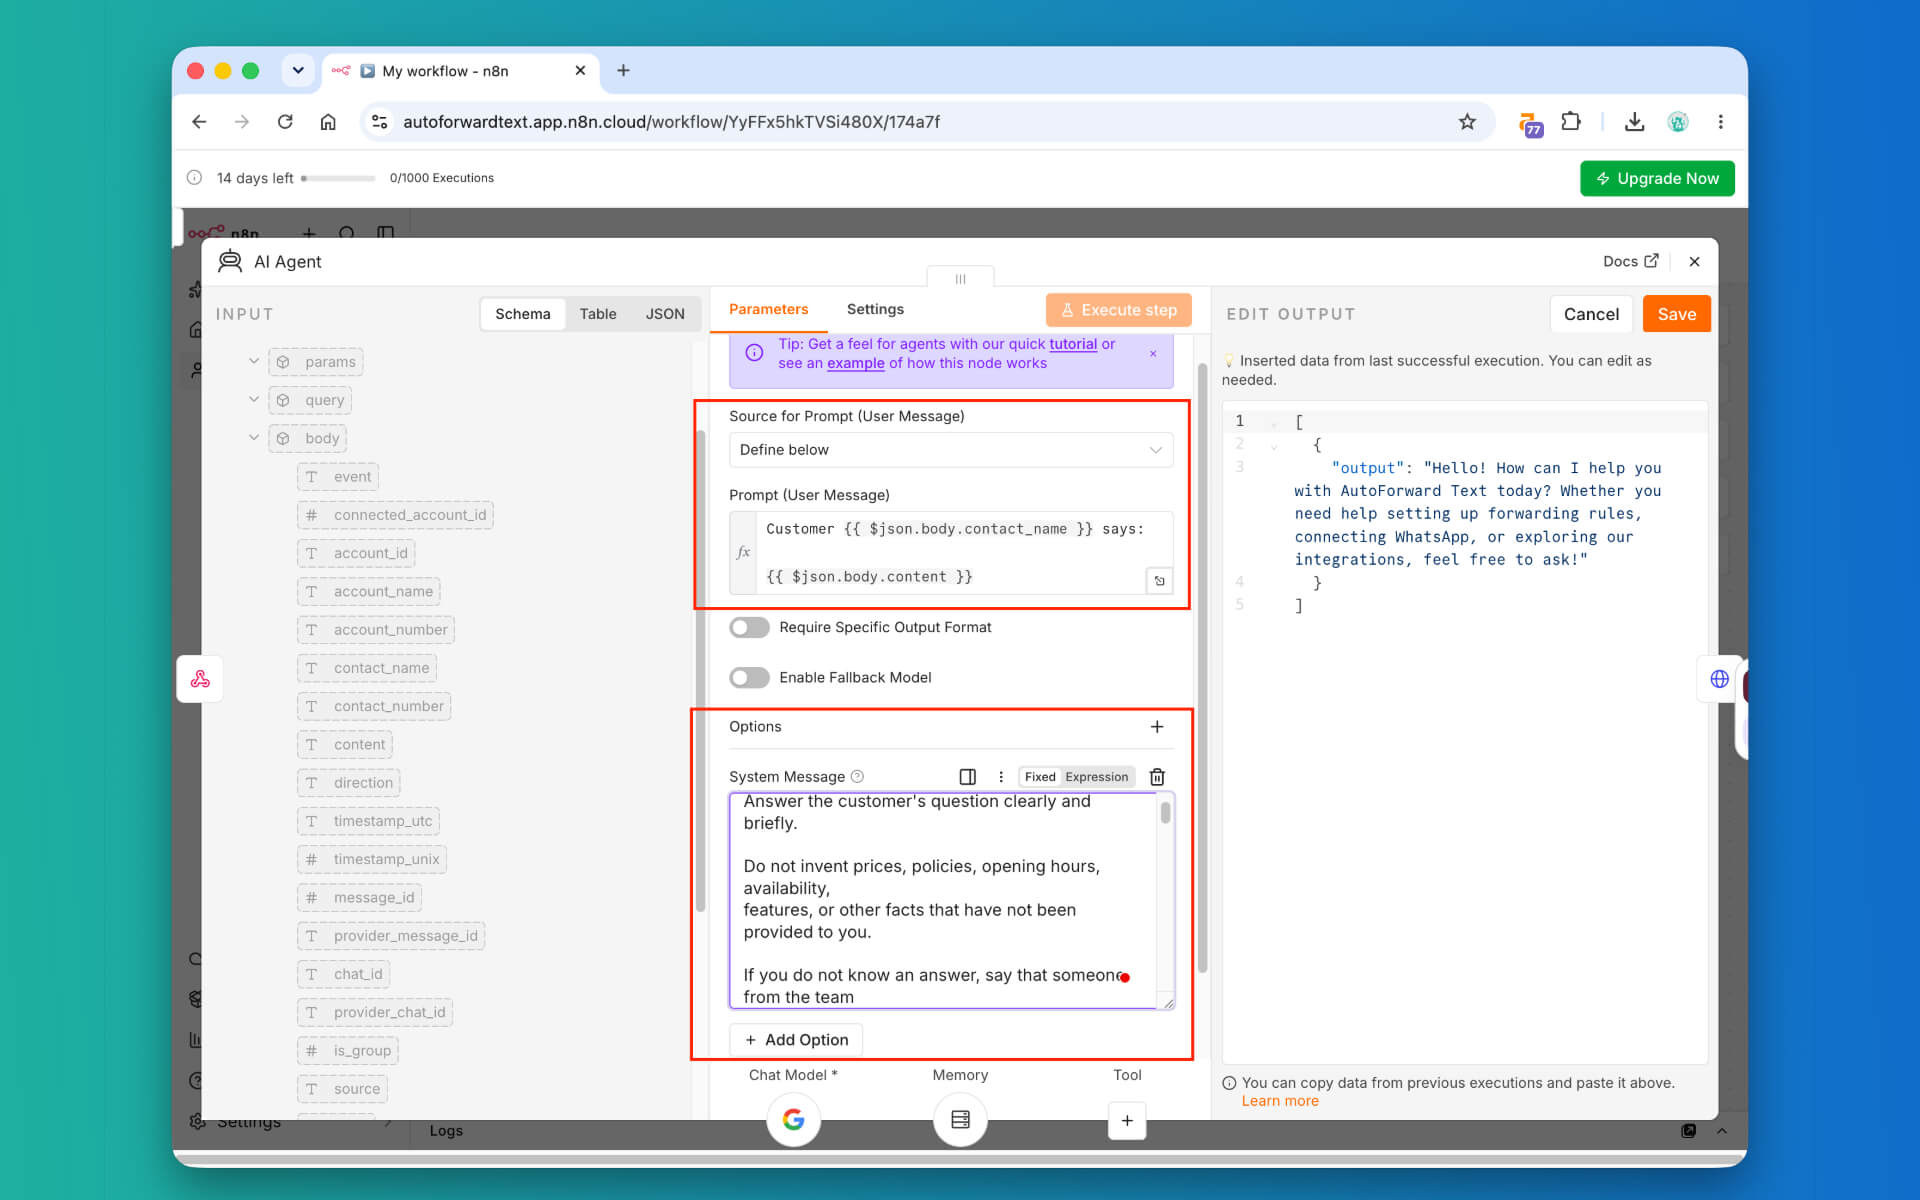
For the AI Agent’s user prompt, map the incoming WhatsApp message content from the Webhook node.
Incoming prompt: Webhook → body → content
For a basic customer-facing agent, keep the instructions narrow:
You are the first-line WhatsApp assistant for our business.

Answer the customer's question clearly and briefly.

Do not invent prices, policies, opening hours, stock availability
or other facts that have not been provided to you.

If you do not know an answer, say that someone from the team
will follow up.

Keep normal replies below 80 words.

Do not claim to be a human.
This is enough to prove the complete messaging loop. You can add business knowledge and tools once the workflow itself is reliable.
Optional: Give the Agent Conversation Memory
If every incoming WhatsApp message is treated independently, you can skip memory.
If you want the agent to understand follow-up messages, connect a Simple Memory node to the AI Agent.
Use a stable value such as the WhatsApp sender’s number as the memory session key:
Session Key = Webhook → body → contact_number
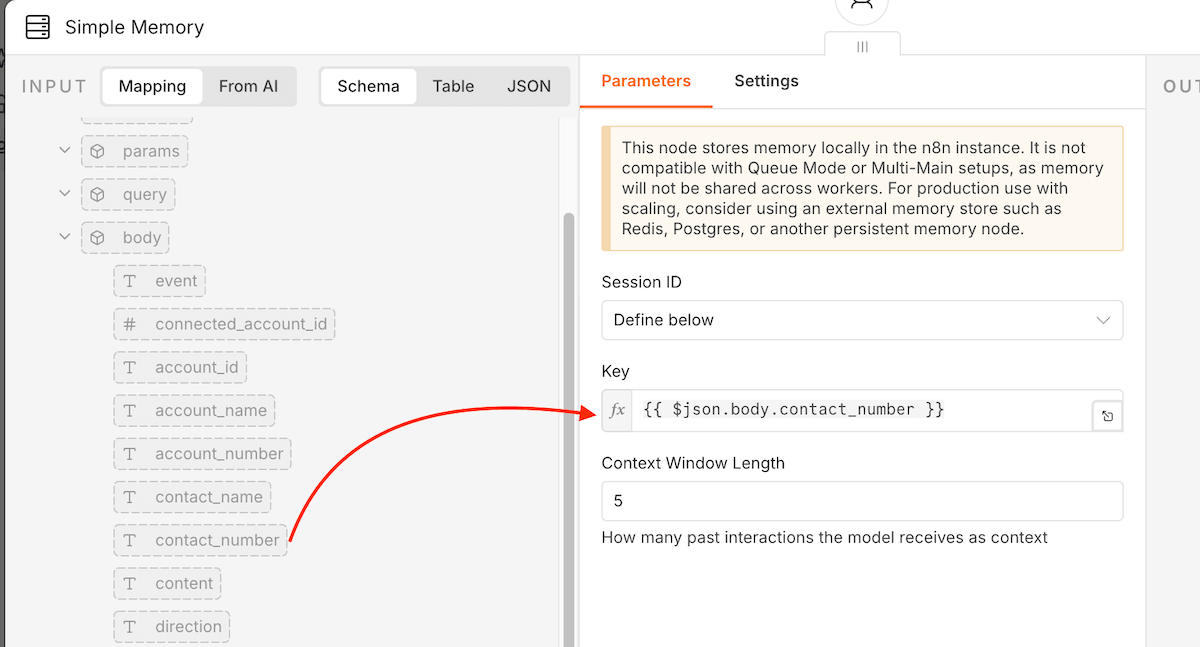
This allows messages from the same sender to share recent conversation context while different customers remain separated.
Without conversation memory, the final question may arrive without enough context to know what “it” refers to.
Step 5: Create an AutoForward Text API Key
Now n8n can receive the customer message and generate an answer. The next step is giving the workflow permission to send that answer back.
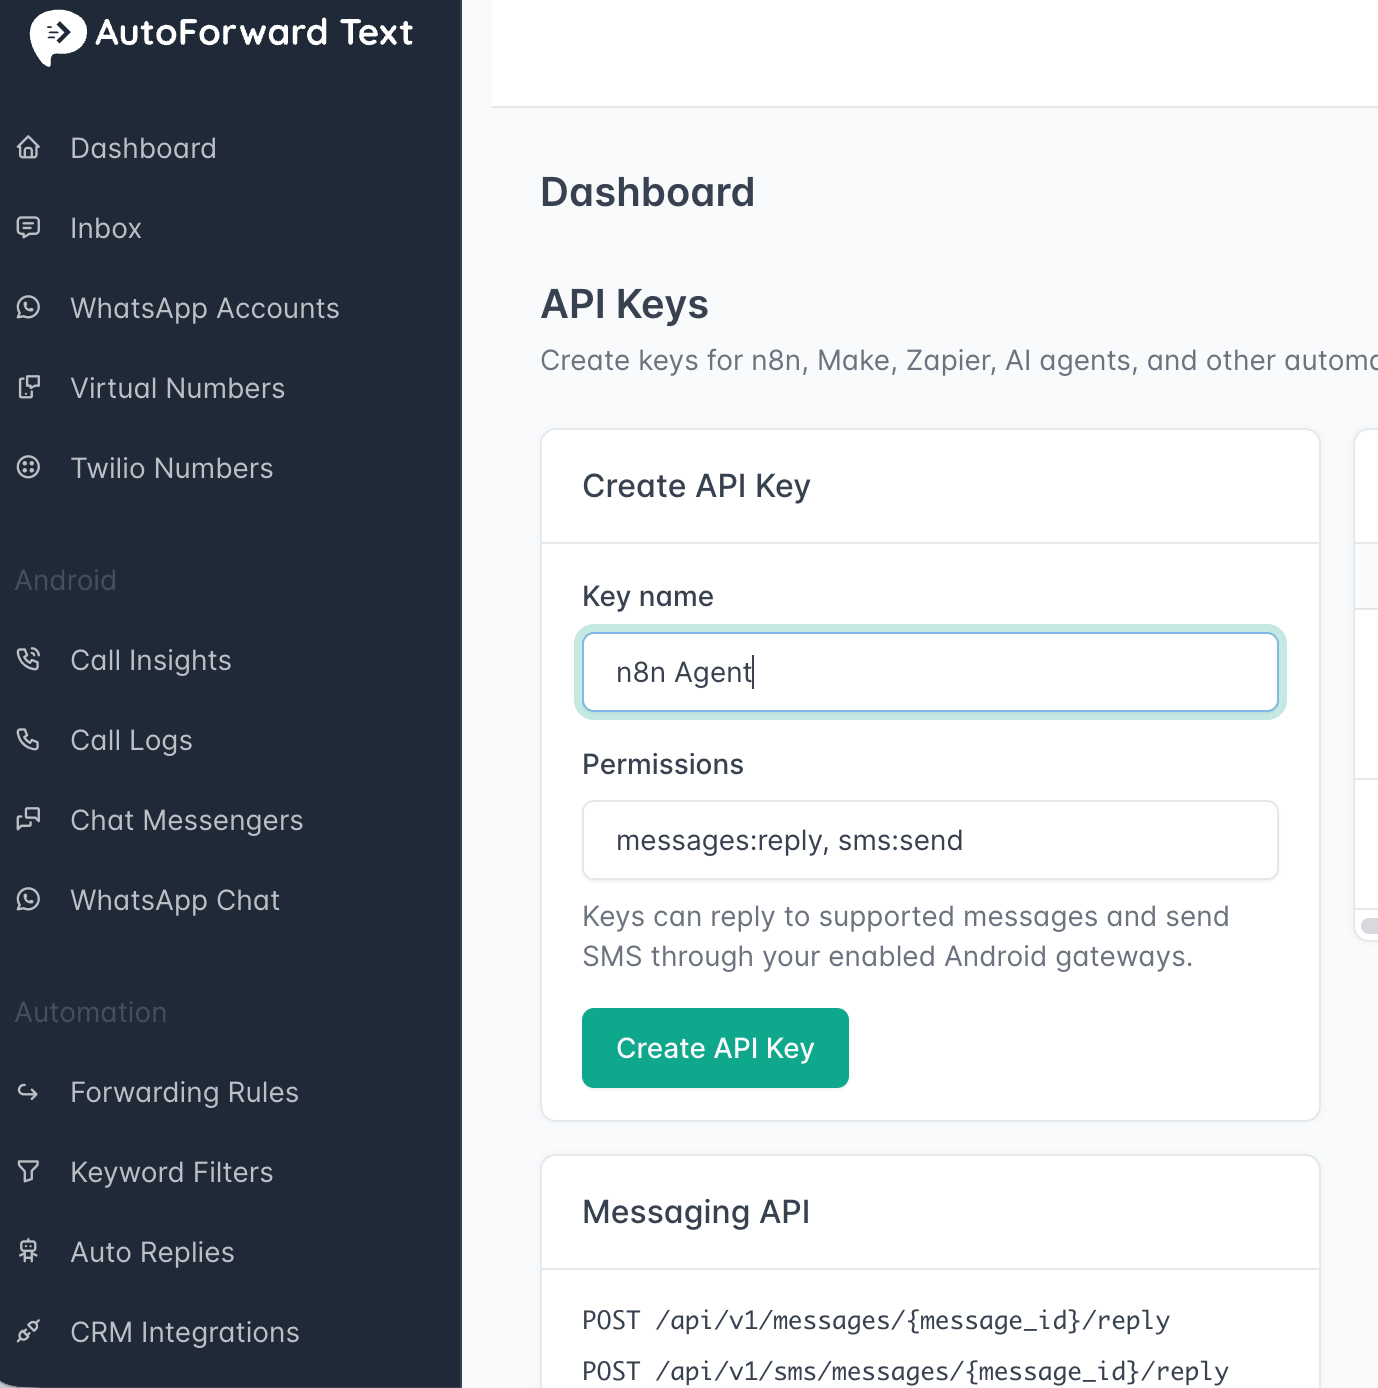
Return to AutoForward Text and open API Keys.
Create a key with a name such as:
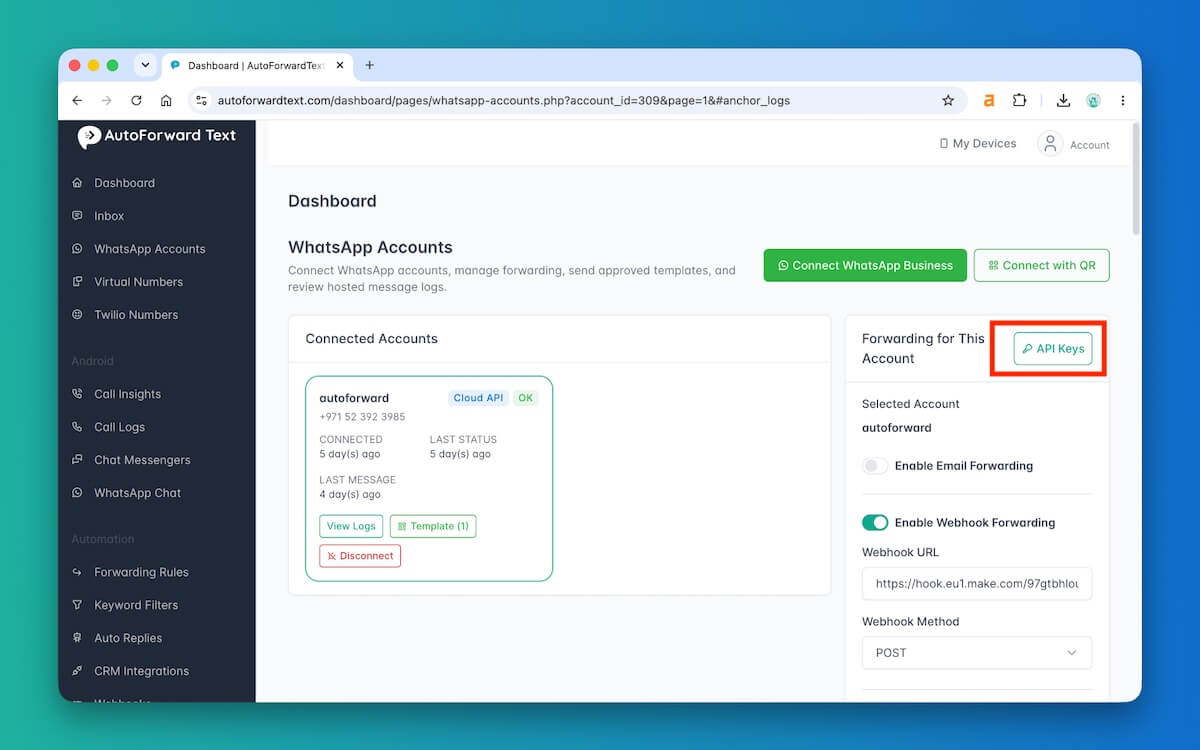
n8n WhatsApp Agent
Give the key the reply permission:
messages:reply
Copy the API key when it is displayed and store it securely.
Step 6: POST the AI Response to reply.endpoint
Add an HTTP Request node after the AI Agent.
Your main workflow now looks like:
↓
AI Agent
↓
HTTP Request
The Chat Model and optional memory nodes connect to the AI Agent as supporting nodes rather than being part of the main left-to-right message path.
Method
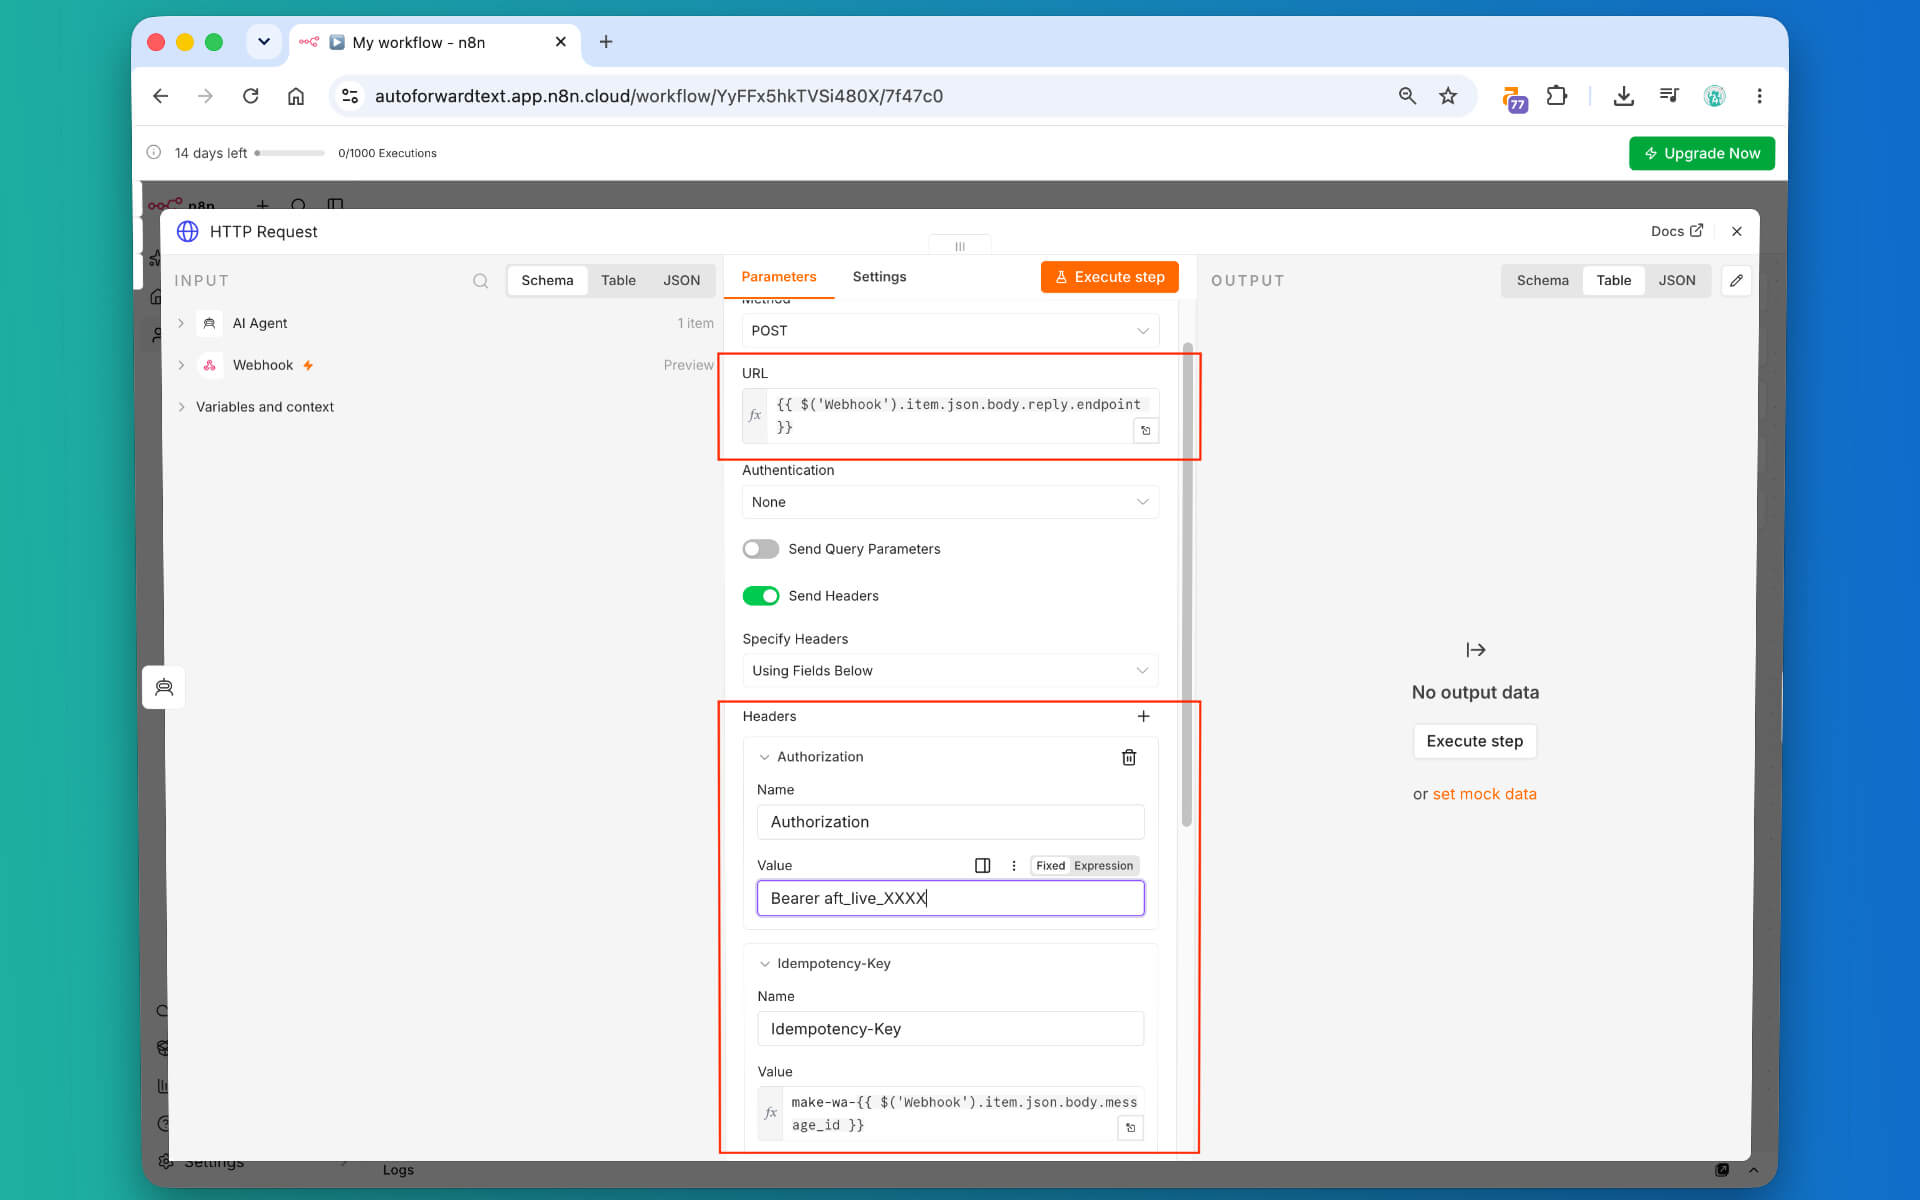
Set the HTTP method to:
POST
URL
Map the reply.endpoint from the original Webhook payload into the HTTP Request URL.
Do not hard-code a message ID.
URL: Webhook → body → reply → endpoint
A resolved request may look like:
https://autoforwardtext.com/api/v1/messages/9274/replyBut the n8n workflow should dynamically use the endpoint supplied with each incoming message.
Headers
Add the Authorization header:
Authorization: Bearer YOUR_AFT_API_KEYAdd an idempotency header based on the incoming message ID:
Idempotency-Key: n8n-wa-9274In the actual workflow, map the message_id dynamically.
Why use an Idempotency-Key? If an execution is retried after a timeout or temporary error, the same logical reply can keep the same key instead of accidentally producing a duplicate WhatsApp message.
JSON Body
Send a JSON body with a single text field:
{
  "text": "AI AGENT RESPONSE"
}
Map the AI Agent’s output into text.
Conceptually, n8n is making the equivalent of this request:
curl -X POST \
  'https://autoforwardtext.com/api/v1/messages/9274/reply' \
  -H 'Authorization: Bearer aft_live_REPLACE_ME' \
  -H 'Idempotency-Key: n8n-wa-9274' \
  -H 'Content-Type: application/json' \
  --data '{"text":"Yes, we can help with that. What would you like to know?"}'
Step 7: Activate and Test the Workflow
Test the workflow from end to end before activating it.
Send a fresh WhatsApp message:
The workflow should now run through the complete loop:
↓
AutoForward Text sends it to n8n
↓
The Webhook triggers the workflow
↓
The AI Agent generates an answer
↓
HTTP Request POSTs the answer to reply.endpoint
↓
AutoForward Text sends the reply
↓
The customer receives it in WhatsApp
Verify the result at every layer:
- The incoming message appears in AutoForward Text.
- The n8n Webhook receives the payload.
- The AI Agent produces the expected answer.
- The HTTP Request node succeeds.
- The answer appears in the original WhatsApp conversation.
Once testing is complete, activate or publish the workflow and replace the n8n test webhook URL in AutoForward Text with the production webhook URL.
This final URL change is easy to miss. A workflow can work perfectly during manual testing but stop receiving events later if AutoForward Text is still sending messages to n8n’s test webhook URL.
What Happens When WhatsApp Requires a Template?
The AI workflow still has to follow WhatsApp’s messaging rules.
If AutoForward Text determines that a normal free-form response is not currently allowed, the Reply API may return:
{
  "ok": false,
  "code": "template_required",
  "message": "An approved WhatsApp template is required to reopen this conversation."
}
Retrying the same AI-generated message will not solve this.
A production n8n workflow can branch on this response and create a human follow-up, send an internal alert, or trigger a separate template-based process.
Troubleshooting
| Problem | Likely Cause | What to Check |
|---|---|---|
| WhatsApp message never appears in AutoForward Text | WhatsApp connection problem | Confirm the connected account is active before troubleshooting n8n |
| AutoForward Text receives the message but n8n does not | Wrong webhook URL or webhook forwarding disabled | Check the forwarding settings and whether you are using the correct test or production URL |
| Test webhook works but production does not | The workflow is not active or AutoForward Text still has the test URL | Activate the workflow and save the production webhook URL in AutoForward Text |
| AI Agent does not run | No working Chat Model is connected | Check the Chat Model node and its credentials |
| AI mixes up customer conversations | Memory Session Key is missing or shared | Use a stable customer-specific key such as contact_number |
| HTTP Request returns an authorization error | API key or Bearer header is wrong | Check the active API key and Authorization: Bearer ... header |
| Customer receives duplicate replies | A retry was treated as a new request | Use one stable Idempotency-Key per incoming message |
| Reply returns template_required | WhatsApp does not allow a normal free-form reply at that point | Handle the condition separately rather than retrying the same reply |
Best diagnostic order: WhatsApp connection → AutoForward Text message log → n8n Webhook → AI Agent output → HTTP Request response → final WhatsApp delivery.
Where to Take the Workflow Next
Keep the first version small:
WhatsApp → n8n Webhook → AI Agent → Reply API
Once the basic workflow is working, you can extend it with CRM data, a knowledge base, or human handoff.
Other useful additions include:
- Lead qualification
- CRM contact lookup or creation
- Order or appointment lookup
- Business-hours routing
- Support ticket creation
- Human approval for sensitive responses
- Different workflows based on message intent
The important part is to keep each component’s responsibility clear.
WhatsApp is the communication channel. AutoForward Text manages the message connection and reply path. n8n runs the automation. The AI Agent decides what the answer should say.
Frequently Asked Questions
Can n8n receive incoming WhatsApp messages?
Yes. In this setup, AutoForward Text receives the WhatsApp message and POSTs the message data to an n8n Webhook node.
Can an n8n AI Agent automatically reply to WhatsApp?
Yes. The AI Agent can generate the answer and an HTTP Request node can post that answer to the AutoForward Text Reply API for delivery to the original WhatsApp conversation.
Does n8n need the WhatsApp chat ID?
No. AutoForward Text includes a message-specific reply.endpoint in the incoming webhook, so n8n can send the answer back without reconstructing the WhatsApp conversation details.
Which n8n nodes are required?
The main workflow uses a Webhook node, an AI Agent with a connected Chat Model, and an HTTP Request node. Simple Memory is optional if you want conversation continuity.
Should I use the n8n test or production webhook URL?
Use the test URL while building and capturing sample data. Once the workflow is active, configure AutoForward Text with the production webhook URL.
Can the AI Agent remember previous WhatsApp messages?
Yes. Connect Simple Memory to the AI Agent and use a stable session key, such as the sender’s WhatsApp number.
How do I prevent duplicate WhatsApp replies?
Use a stable Idempotency-Key based on the incoming AutoForward Text message ID so a retry of the same logical reply does not become a separate message.
Can I use n8n without AI?
Yes. You can replace the AI Agent with normal n8n logic, filters, database lookups, CRM nodes, templates, or other workflow actions and still use the same incoming webhook and Reply API.
What happens if WhatsApp requires an approved template?
A normal AI-generated free-form response cannot bypass WhatsApp’s messaging rules. Handle the template-required response separately in the workflow.
Final Thoughts
This setup works well because n8n is used for what it is good at: workflow automation and AI orchestration.
It does not need to own the underlying WhatsApp connection.
AutoForward Text receives the WhatsApp message and supplies a reply endpoint. n8n processes the event and generates the answer. The Reply API sends the result back into the original WhatsApp conversation.
Start with the basic round trip first. Once that is reliable, you can add data sources, tools, routing, and human handoff without changing the core messaging flow.
Connect WhatsApp to Your n8n Workflow
Use AutoForward Text to receive WhatsApp messages, forward them to n8n, and send automated responses back through the original conversation.